Here we'll show you how to use our JavaScript SDK and a server-side proxy language to send an email via Gmail. We’ll use PHP as our server-side proxy language for this tutorial, but you can also use Node.js, Ruby, Java, or Python.
To learn more about using non-PHP proxy languages, take a look at the Web Application Server tutorial.
1Log in to Temboo. If you don't already have an account, you can register for free.
2Create a new .html file and save it as index.html into a folder where you'll save the rest of your project files.
3Create a new .php file and save it as proxy-server.php into the same project folder as your index.html file.
4Download the latest Temboo JavaScript SDK and unzip the file.
5Change the name of the resulting folder to js-sdk and move it into the same folder as your index.html file.
6Download the latest Temboo PHP SDK and unzip the file.
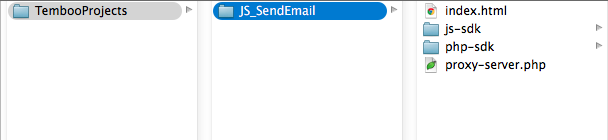
7Change the name of the resulting folder to php-sdk and move it into the same folder as your index.html.html file. Your project folder should look similar to the screenshot below:
8You'll also need a Gmail account, which you can create here. To authenticate with Google, you'll want to enable 2-Step Verification and generate an App Password for Temboo.
9Sign in to your Google Account settings page by clicking on your name or picture in the upper right corner of the screen and then clicking Account.
10Scroll down to the "Signing in" box.
11Click 2-Step Verification. This will bring you to the 2-Step Verification settings page.
12You will then see a step-by-step guide which will guide you through the setup process.
13After you've enabled 2-Step Verification, you'll be prompted to create an App Password.
14In the Select app dropdown menu, choose "Other", and give this app a name (e.g., TembooApp).
15Click "Generate". You'll be given a 16-digit passcode that can be used to access your Google Account from Temboo.
Note: If you wish to authenticate with OAuth credentials, you should use the Google > Gmailv2 Choreos.
16Go to the Google > Gmail > SendEmail Choreo page. Select JavaScript from the drop down menu at the top of the page and insert your information into the required inputs.
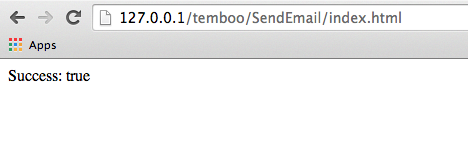
17Click Generate Code to test the Choreo from our website, and you'll see the value "true" for the Success output in the Output section and an email will be in the inbox for the ToAddress you provided.
18Scroll down to find the Code section of the Choreo page. Copy and paste the code snippet into your index.html file.
19In the same file, make sure that your script source points to the correct location of the temboo.js SDK file.
<!-- Adjust to point at the copy of the Temboo JavaScript SDK on your server -->
<script src="js-sdk/js/temboo.js">< /script>
20In the same file, we'll also want to confirm that the location of our proxy is correctly specified. Our server is proxy-server.php.
// Instantiate the client proxy with the URI of your server proxy
var temboo = new TembooProxy('proxy-server.php');
21You'll notice another code snippet box below the Code section on the Choreo page called Proxy Code. Use the dropdown menu to select PHP, then copy and paste the code snippet into your proxy-server.php file.
22In the proxy-server.php file, make sure that the require_once line points to the correct location of the PHP SDK file in the php-sdk folder that you downloaded earlier.
require_once('php-sdk/src/temboo.php');
23Now let's add a few more lines so that we can see when an email has been sent without looking in the developer console. In your index.html file, locate the console.log print statement in the showResult success callback function and replace them with document.write statements.
// Success callback
var showResult = function(outputs, outputFilters) {
    // Display outputs
    if(outputFilters) {
        // Display named output filters
        for(var name in outputFilters) {
            console.log(name + ':');
            for(var item in outputs[name]) {
                document.write('    ' + outputs[name][item]);
            }
        }
    } else {
        // Display raw outputs
        for(var name in outputs) {
            document.write(name + ': ' + outputs[name]);
        }
    }
};
24Run your PHP server.
25You'll see a success message in your browser, and an email in the inbox for the ToAddress that you specified!
26Here's the full code:
JavaScript Code:
<!-- Adjust to point at the copy of the Temboo JavaScript SDK on your server -->
<script src="js-sdk/js/temboo.js"></script>
<script>
// Instantiate the client proxy.
// You may need to adjust the path to reflect the URI of your server proxy
var temboo = new TembooProxy('proxy-server.php');

// Add the sendEmail Choreo
var sendEmailChoreo = temboo.addChoreo('jsSendEmail');

// Add inputs
sendEmailChoreo.setInput('MessageBody', MESSAGE);
sendEmailChoreo.setInput('Subject', SUBJECT);
sendEmailChoreo.setInput('Password', PASSWORD);
sendEmailChoreo.setInput('Username', FULL EMAIL ADDRESS);
sendEmailChoreo.setInput('FromAddress', FROM EMAIL ADDRESS);
sendEmailChoreo.setInput('ToAddress', TO ADDRESS);
// Success callback
var showResult = function(outputs, outputFilters) {
    // Display outputs
    if(outputFilters) {
        // Display named output filters
        for(var name in outputFilters) {
            console.log(name + ':');
            for(var item in outputs[name]) {
                document.write('    ' + outputs[name][item]);
            }
        }
    } else {
        // Display raw outputs
        for(var name in outputs) {
            document.write(name + ': ' + outputs[name]);
        }
    }
};

// Error callback
var showError = function(error) {
    if(error.type === 'DisallowedInput') {
        console.log(error.type + ' error: ' + error.inputName);
    } else {
        console.log(error.type + ' error: ' + error.message);
    }
};

// Run the Choreo, specifying success and error callback handlers
sendEmailChoreo.execute(showResult, showError);
</script>
Proxy Code:
<?php
// Require the core Temboo PHP SDK and required libraries
require_once('php-sdk/src/temboo.php');

// Instantiate the session and Choreo
$session = new Temboo_Session('ACCOUNT_NAME', 'APP_NAME', 'APP_KEY');
$sendEmailChoreo = new Google_Gmail_SendEmail($session);

// Act as a proxy on behalf of the JavaScript SDK
$tembooProxy = new Temboo_Proxy();

// Add Choreo proxy with an ID matching that specified by the JS SDK client
$tembooProxy->addChoreo('jsSendEmail', $sendEmailChoreo);

// Set default input values
$tembooProxy->allowUserInput('jsSendEmail', 'MessageBody')->allowUserInput('jsSendEmail', 'Subject')->allowUserInput('jsSendEmail', 'Password')->allowUserInput('jsSendEmail', 'Username')->allowUserInput('jsSendEmail', 'FromAddress')->allowUserInput('jsSendEmail', 'ToAddress');

// Execute choreo
echo $tembooProxy->execute($_POST['temboo_proxy']);
?>
We're all finished! Now your JavaScript application can send email from your Gmail account, check out the rest of the JavaScript tutorials to see what else you can add. Looking for something new? Why not check out the rest of the 2000+ Choreos in our Library and think about how you could extend this example by combining it with something else.
Once you've got your code up and running, you're ready to move on and do more. From monitoring your running applications, to moving your generated Temboo code to your preferred development environment and sharing it with colleagues, collaborators and friends - we've got you covered.
We're always happy to help. Just email us at support@temboo.com, and we'll answer your questions.