Temboo makes it easy to build Android applications that connect to over 100 web-based resources and services (e.g. Facebook, Dropbox, US Census data) by standardizing how you interact with their Application Programming Interfaces (APIs). Don't worry if you're not familiar with APIs – with Temboo you don't have to worry about the details.
Here we'll show you how to use the Temboo Android SDK to write a simple Android application that uses Google's Geocoding API to retrieve the Latitude and Longitude for a specific address e.g., 104 Franklin St, New York City. What makes Temboo uniquely powerful and useful is that, once you know how to use one API, you know how to work with any API in our Library.
Before we get started, make sure that you've got Android 1.6 (or later) and an Android code editor. We've used Android Studio 0.4.6 for these tutorials but they will work equally well in whatever IDE you are using.
1Create a new project in Android Studio.
2Download and extract the Temboo Android SDK.
3 Add the Temboo SDK to your project:
.jar file (e.g. temboo-android-sdk-1.76-core.jar) in the folder you extracted in step 2libs folder of your projectGoogle-1.76.jar) from the folder you extracted in step 2, which will allow us to use Google's Geocoding API.
We'll now make some adjustments to the default application that Android Studio has generated for us.
4Open the Android manifest located at app > src > main > res > AndroidManifest.xml In order to access the internet, you will need to add <uses-permission android:name="android.permission.INTERNET"/> below the <application> tag.
5The default layout of the application included a TextView that we'll make use of, but before we can do so we need to give it an identifier. Locate and double-click on the fileapp > src > main > res > layout > activity_main.xml. This file describes the layout of our MainActivity class.
6Click on the "Hello World" text in the device emulator to select the TextView.
7In the Properties panel on the bottom-right of the editor, find the id property. Click to the right of it and enter @+id/latlong
8Next, locate the text property and delete the default "Hello World" value (we'll fill this in programmatically later).
9Log in to Temboo. If you don't already have an account, you can register for free here.
10 Go to the Google > Geocoding > GeocodeByAddress Choreo in our Library.
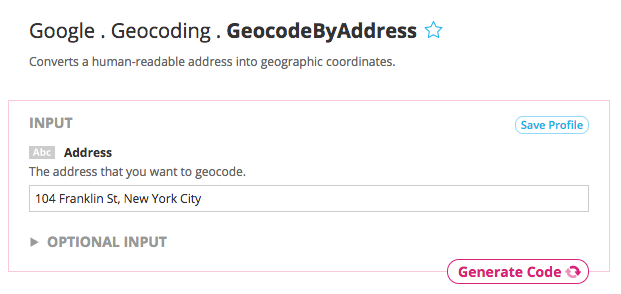
11From the drop down menu at the top of the page, select Android.
12Enter any address or ZIP code in the Address input field e.g., 104 Franklin Street, New York City.
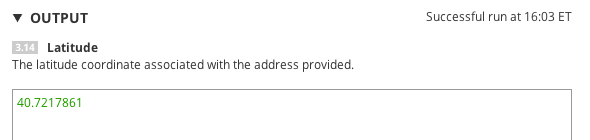
13Now click Generate Code to test the Choreo from our website. After a moment you'll see the data that Google sends back shown in the Output section.
When you run any Choreo from our website, we automatically generate code that can be used to make the same API call in many languages, including Java for Android. Here we'll show you how to use these snippets in your code.
14Scroll down to the Code section of the Library page to find the generated code.
15Because network operations block the main thread execution, we'll need to make our calls to Temboo using AsyncTask. Create a new class that extends AsyncTask called "GeocodingTask" (or whatever you like), adding the @Override implementations for doInBackground and onProcessComplete:
package com.temboo.android.gettingstarted.app;

import android.os.AsyncTask;
import android.util.Log;
import android.widget.TextView;

/**
 * An AsyncTask that will be used to interact with Temboo
 */
class GeocodingTask extends AsyncTask<Void, Void, String> {

    private TextView textView;

    public GeocodingTask(TextView textView){
        this.textView = textView;
    }

    @Override
    protected String doInBackground(Void... arg0) {
        try {
            // Temboo code will go here
        } catch(Exception e) {
            // if an exception occurred, log it
            Log.e(this.getClass().toString(), e.getMessage());
        }
        return null;
    }

    protected void onPostExecute(String result) {
        try {
            // Will update UI here
        } catch(Exception e) {
            // if an exception occurred, show an error message
            Log.e(this.getClass().toString(), e.getMessage());
        }
    }
}
Notice that we've added a constructor that takes a TextView as an argument. This will reference the TextView we set up earlier.
Now that our AsyncTask is set up, copy the generated code snippet from the Temboo website and paste it into the doInBackground method of your AsyncTask class. We'll also add the required imports to create a GeocodeByAddress Choreo, GeocodeByAddressInputSet, and GeocodeByAddressResultSet:
import com.temboo.Library.Google.Geocoding.GeocodeByAddress;
import com.temboo.Library.Google.Geocoding.GeocodeByAddress.GeocodeByAddressInputSet;
import com.temboo.Library.Google.Geocoding.GeocodeByAddress.GeocodeByAddressResultSet;
import com.temboo.core.TembooSession;
    @Override
    protected String doInBackground(Void... arg0) {
        try {
            // Instantiate the Choreo, using a previously instantiated TembooSession object, eg:
            TembooSession session = new TembooSession("ACCOUNT_NAME", "APP_NAME", "APP_KEY");
            GeocodeByAddress geocodeByAddressChoreo = new GeocodeByAddress(session);

            // Get an InputSet object for the choreo
            GeocodeByAddressInputSet geocodeByAddressInputs = geocodeByAddressChoreo.newInputSet();

            // Set inputs
            geocodeByAddressInputs.set_Address("104 Franklin Street, New York City");

            // Execute Choreo
            GeocodeByAddressResultSet geocodeByAddressResults = geocodeByAddressChoreo.execute(geocodeByAddressInputs);
        } catch(Exception e) {
            // if an exception occurred, log it
            Log.e(this.getClass().toString(), e.getMessage());
        }
        return null;
    }
Each Choreo in the Android SDK returns a ResultSet subclass that contains get methods tailored specifically to the outputs of that Choreo. Using the ResultSet, you can retrieve the raw data (typically XML or JSON) returned by a third-party API or relevant fields that we've parsed out of the response for you.
To update the UI with the latitude and longitude returned by the Choreo, do the following:
16Add the following code at the bottom of the try block of the doInBackground method in your class:
return geocodeByAddressResults.get_Latitude() + "/" + geocodeByAddressResults.get_Longitude();
The return value we've just added is passed by Android as an argument to the onPostExecute method, we'll update the UI there:
    protected void onPostExecute(String result) {
        try {
            // Update the UI
            textView.setText(result);
        } catch(Exception e) {
            // if an exception occurred, show an error message
            Log.e(this.getClass().toString(), e.getMessage());
        }
    }
That's it! At this point, your AsyncTask implementation should look something like this:
package com.temboo.android.gettingstarted.app;

import android.os.AsyncTask;
import android.util.Log;
import android.widget.TextView;

import com.temboo.Library.Google.Geocoding.GeocodeByAddress;
import com.temboo.Library.Google.Geocoding.GeocodeByAddress.GeocodeByAddressInputSet;
import com.temboo.Library.Google.Geocoding.GeocodeByAddress.GeocodeByAddressResultSet;
import com.temboo.core.TembooSession;

/**
 * An AsyncTask that will be used to interact with Temboo
 */
class GeocodingTask extends AsyncTask<Void, Void, String> {

    private TextView textView;

    public GeocodingTask(TextView textView){
        this.textView = textView;
    }

    @Override
    protected String doInBackground(Void... arg0) {
        try {
            // Instantiate the Choreo, using a previously instantiated TembooSession object, eg:
            TembooSession session = new TembooSession("ACCOUNT_NAME", "APP_NAME", "APP_KEY");
            GeocodeByAddress geocodeByAddressChoreo = new GeocodeByAddress(session);

            // Get an InputSet object for the choreo
            GeocodeByAddressInputSet geocodeByAddressInputs = geocodeByAddressChoreo.newInputSet();

            // Set inputs
            geocodeByAddressInputs.set_Address("104 Franklin Street, New York City");

            // Execute Choreo
           GeocodeByAddressResultSet geocodeByAddressResults = geocodeByAddressChoreo.execute(geocodeByAddressInputs);

            return geocodeByAddressResults.get_Latitude() + "/" + geocodeByAddressResults.get_Longitude();
        } catch(Exception e) {
            // if an exception occurred, log it
            Log.e(this.getClass().toString(), e.getMessage());
        }
        return null;
    }

    protected void onPostExecute(String result) {
        try {
            // Update UI
            textView.setText(result);
        } catch(Exception e) {
            // if an exception occurred, show an error message
            Log.e(this.getClass().toString(), e.getMessage());
        }
    }
}
17 In order to see your new task in action, you will need to invoke it from the MainActivity class created with your project. The simplest way to do this is to add a call to it in the onCreate method, which should end up looking like this:
@Override
protected void onCreate(Bundle savedInstanceState) {
    super.onCreate(savedInstanceState);
    setContentView(R.layout.activity_main);
    TextView textView = (TextView) findViewById(R.id.latlong);
    new GeocodingTask(textView).execute();
}
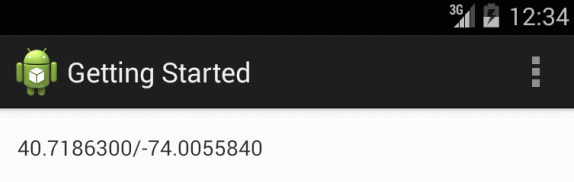
18 Deploy and run the application. After a few moments the output from the Xhoreo call should be printed to your device's (or the emulator's) screen. Congrats! You just ran your first Choreo from our Android SDK.
Now you're ready to run any of our 2000+ Choreos in Android. You're just a few steps away from making something extraordinary. You can check out some more examples that use our Android SDK here.
Once you've got your code up and running, you're ready to move on and do more. From monitoring your running applications, to moving your generated Temboo code to your preferred development environment and sharing it with colleagues, collaborators and friends - we've got you covered.
We're always happy to help. Just email us at support@temboo.com, and we'll answer your questions.